Showing posts with label recipe. Show all posts

Monday, June 13, 2011

Recipe: Beer Batter Pakoras

Its raining, its pouring!!! Monsoons make me hungry. Well, just about everything makes me hungry, but monsoons bring out the cravings. There is nothing like enjoying some pakoras on a nice rainy sunday afternoon. Lets add a twist though, lets make them beer batter pakoras <insert evil laugh>.


Ingredients:-

1 cup of Besan Flour (Chick pea flour)
1 teaspoon of coriander seeds
1 teaspoon of fennel seeds
1/2 teaspoon of Red chilli powder
1/2 teaspoon of salt.
1 teaspoon of Garam Masala or Chaat masala (as you want it flavoured)
Assortment of whatever you want to use to make pakoras. In my case it was  Potatoes.
1 can of Beer.
Sunflour or other oil for frying purposes.

Lets COOK!!!

Time for some Mise en Place. Lets boil those potatoes and cut them up into thin disks. You can possibly use raw potato but this gives you a nice soft pakora. Season them with a bit of salt, some red chilli powder.


To spice up the batter you want some Coriander and some fennel seeds.


Pound away at them in a mortar and pestle till you get as fine a powder as possible. 
(It will become finer. This is an intermediate stage, put some elbow grease into it!!!)

Add your ground spice, salt, chilli powder to your Besan flour. 


Now crack open that can of beer and slowly start pouring it into the mixture. Keep stirring it constantly, but be gentle. The whole idea here is to try and maintain the carbonation within the liquid. The air within the beer is what give shit pakora batter its light fluffiness.


I got it to the consistency of something like cream. You can go thicker or thinner if you like. If you go thinner, it might fall off the potato whilst frying. If you are making onion pakoras you want it to the consistency of a really thick thick paste, or maybe coat the onions in some all purpose flour so they hold onto the batter. (Not something I've tried, so let me know how it turns out if you do).
So pour slowly till you get the consistency you want. Don't worry about having beer left over, I doubt it will go to waste.
Now work quickly. You do not want the batter to stay out too long because it will again loose its aeration. Get the sunflower (or other frying oil) onto a wok, and start heating it.


When the oil is hot, dip the potato in the batter and drop it into the oil. Let them fry till they get a nice golden brown texture.


Once they are done, remove them with a slotted spoon and sit them on some paper towels to soak up the excess oil.


Sprinkle a little Chaat masala on them and serve them with tomato ketchup and enjoy the rains!!!!


Printable Recipe:

Ingredients:-

1 cup of Besan Flour (Chick pea flour)
1 teaspoon of coriander seeds
1 teaspoon of fennel seeds
1/2 teaspoon of Red chilli powder
1/2 teaspoon of salt.
1 teaspoon of Garam Masala or Chaat masala (as you want it flavoured)
Assortment of whatever you want to use to make pakoras. In my case it was  Potatoes.
1 can of Beer.
Sunflour or other oil for frying purposes.

Lets COOK!!!

1) Boil your potatoes and cut them into little discs. Season with a little salt and red chilli pepper
2) Grind your fennel and coriander seeds in a mortar and pestle.
3) Season your besan flour with the ground spices, salt, and red chilli powder.
4) Slowly add beer to your flour till you get the consistency you are aiming for. Be gentle whilst mixing the beer so as to not lose aeration. Work quickly.
5) Heat your oil in a wok.
6) When it comes to temperature, dip the potatoes into the batter and drop them into the hot oil.
7) Cook them till they are golden brown in colour and remove with a slotted spoon.
8) Let the pakoras sit on paper towels to soap up the excess oil.
9) Season them with Chaat masala, serve with Tomato Ketchup.


Friday, April 8, 2011

Recipe: A Simple Marinara Sauce

There are few sauces as versatile as a classic Marinara. Eat it with anything, on anything, or just use it as a dip. You can play with the recipe and make it as rich as possible.
Throw in some mushrooms, some bell peppers, different chillis, some corn for texture, play with it how you like. It makes an excellent sauce for pizzas (just add some oregano) so you don't have to get that store-bought bottled crap. Add some Garam masala and Chaat masala and you have some very interesting Indian flavours. Make it with red wine and serve the same bottle with your food. Add some gound meat and mustard to it. Use cheeses within the sauce. I love adding minced Jalapeno peppers and mushrooms to this and serving it with toast in the morning with some grated cheese.
So hence for this post I am going to present a simple basic marinara. This can be the template from which you expand the taste to your liking. GO WILD!!!.

Ingredients:-

1/2 cup Tomato Purée
4 large tomatoes (say, 250 grams)
5 tablespoons cup of olive oil
3 cloves of garlic (minced)
1 large onion (finely diced)
1/4 cup of fresh Basil leaves
1/2 tablespoon of dried Thyme.
Salt, black pepper, red chilli to taste.
Lets COOK!!!

Lets get those lovely red tomatoes out and dice them up.


Time for Mis en Place. (Everything in place). Now here I am not using any onions since there were people I was cooking for who didnt like onions. I otherwise recommend you keep them when you make marinara.Look and drool at all those delicious ingredients.


Get a stove on. Put on a pot and heat up the olive oil.


When it just starts to bubble, add your garlic and onions and sauté them for a few minutes until translucent. Once those are done, add your purée and diced tomatos and let them cook for a few minutes, stirring occasionally.


Add your basil, salt, pepper, chilli and let it simmer for about 10 minutes or it thickens to the consistency you want.

I served it with a yummy Ravioli (Spinach, ricotta cheese and mushrooms) and a side of creamy mashed potatoes. (will put up posts on those soon).


Recipe: Creamy Basil Pesto Sauce

I love Pasta. I love making it, I love eating it. But you cannot have a good pasta without a good sauce. I have decided to try making at least one new sauce every couple of weeks. First is a classic, The Basil Pesto.
Pesto comes from the Genoese word pestâ (from Genoa in Northern Italy) which basically means to crush or to pound. Originally this sauce was made using a mortar and pestle, however you can also make it using a food processor. (Once I get a mortar and pestle, I will give the traditional way a try too).


Ingredients:

2 cups fresh Basil Leaves
1/2 cup of Pine Nuts
1/2 cup Parmesan-Reggiano cheese (freshly grated)
1 cup extra virgin Olive Oil
3 cloves of garlic
1/2 teaspoon of thyme. (Optional)
Salt, black pepper to taste. 

Lets COOK!!!.

Lets start with those lovely fresh basil leaves.

Wash and clean them, add them to a food processor along with your garlic and pine nuts. Add a little olive oil, just enough to get them minced.
Blend them for a bit and then add in your cheese. I also threw in a little bit of thyme just for taste. (this is optional).


Now you can add your remaining Olive oil and get it to the consistency you want. As you can see, we have gotten a very creamy consistency. If you want it to have a leafier, rougher consistency, cut down on the olive oil (use only 1/2 a cup) and the blending time.


Fettucini is my favourite pasta and it goes beautifully with pesto. So for this cook-off I boiled some as per the instructions on the case.

Toss it together with that yummy creamy pesto, garnish with basil (I ran out of basil so used coriander) , maybe grate some parmesan over and above and serve.


Printable Recipe:-


Ingredients:

2 cups fresh Basil Leaves
1/2 cup of Pine Nuts
1/2 cup Parmesan-Reggiano cheese (freshly grated)
1 cup extra virgin Olive Oil
3 cloves of garlic
1/2 teaspoon of thyme. (Optional)

Salt, black pepper to taste. 

Steps:

1) Wash and clean the basil leaves and add along with the garlic and pine nuts to a food processor.
2) Add a little olive oil (3-4 tablespoons) and start blending.
3) Once they are decently creamy, add the cheese, thyme, salt and pepper along with a bit more olive oil.
4) Keep blending and slowly adding the olive oil till you get it to the required consistency.
5) The more olive oil you add and the longer you blend it, the creamier will be the final consistency.
6) Toss with some pasta and enjoy!!!


Wednesday, March 9, 2011

Fun Times: Making Okonomiyaki

What do you get when you put 4 friends in a kitchen attempting a dish that requires more flips than a gymnastics routine? You get Okonomiyaki.

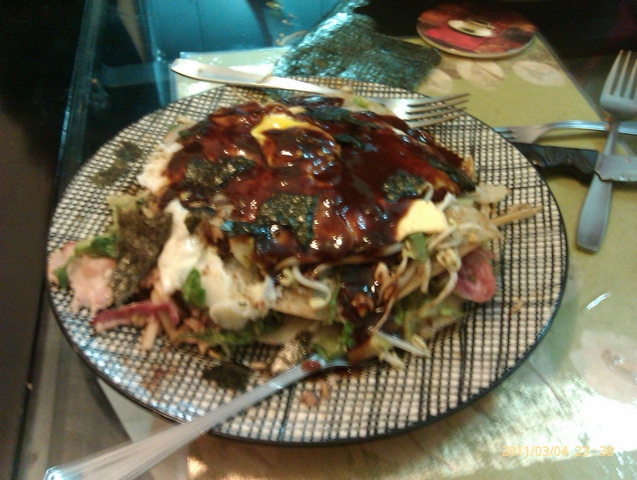
The dish we are going to attempt

Ever since I posted my pictorial on it, a friend has hounded me to attempt making it in India. Since I love the dish, you can imagine I did not need much persuasion to give it a shot. After 2 months of delay, we finally decided to bite the bullet.
The characters in this play include:-


Mr. Joydas Mukherjee : My Sous-Chef and our host for the evening.

 Anu: Pancake consultant and muse

Aditya: Apprentice and Gopher

But we quickly ran into a hurdle. Nowhere in India do you get Okonomiyaki sauce. Time to innovate. Searching for an alternative, we arrived at the following concoction:-
1 cup of Worcestershire Sauce
1 cup of Teriyaki Sauce
1 cup of Tomato puree,
3 Tablespoons of Soy Sauce
3 tablespoons fish stock.
2 tablespoons corn flour.
1 tablespoon of honey.
Salt to taste.

The fish stalk that I used was a small packet of Tsuyu fish stock. I by chance got it at Godrej Nature's Basket, but if you cannot get it, you can replace it by half and half fish sauce + oyster sauce.


Be careful, this sauce has some serious kick to it. If it gets too spicy, you can increase the tomato puree. However, the spice goes perfectly with the vegetables and noodles in the okonomiyaki, so dont worry about it too much. 

The remaining ingredients are easy to find:-

For the batter:-

2 cups of all purpose flour.
750 ml of water
salt, sugar to taste.

For the filling:-

3 large heads of shredded lettuce or cabbage
100 grams of Bean sprouts
100 grams of Button mushrooms
Your choice of meat. We chose chicken-bacon strips.
1 egg per finished okonomiyaki.


We served it on a base of udon noodles so get a packet of those as well. We added cheese slices and Nori as a garnish, so feel free to add that on.


This is a dish that really requires mis en place. It does not take very long to cook, but the prep can be time consuming.
Aditya, who instigated this little cook-off, revealed to us that he is a kitchen virgin. He has never spent much time cooking so we decided to take him under our wing and ease him into the cooking process by making him chop our vegetables.


and also to prep our mushrooms.


 In the meantime it was left to me to prepare the sauce. You start of with your three ready-made sauces which are the Worcestershire, the Teriyaki and the Soy.


Add them to a pot and turn on the heat. Add in your tomato puree, your corn flour and fish stock.


We added some honey to give it a nice mix of sweet and spice. You can add normal sugar, but I felt that honey would have a nice earthy taste with all the vegetables in this dish.


Just simmer the sauce on medium heat. You are aiming to reduce it to a slightly thinner than ketchup consistency. Stirring it constantly was the job given to Aditya once he had finished cutting the veggies.


We decided to pan fry the chicken-bacon strips and keep them ready.


The batter was simple as mixing the flour, water, salt and sugar. You want a consistency like a pancake batter. You cannot leave it too thin, else you wont get a firm pancake.

Next was to get on with the noodles and keep them ready. Now normally these should be served warm with the food, but since this was experimentation time, we decided that we would sacrifice warm noodles for sanity.
Start off by getting some water on the boil in a large pot. When it boils, throw in your noodles with some salt. Cook in boiling water for a few minutes, then turn off the heat and let it cook in the water on its own for about 5 minutes. (These were the instructions on my packet of udon noodles. Follow whatever is written on yours).


Just to give it a bit of flavour, we threw in some olive oil in a pot and gently fried the noodles for a short time.


Once the noodles were cooked, we mixed in some of the sauce we had made and kept them on the side.


Now everything was ready and it was time to attempt our first okonomiyaki.

Our first attempt was an aesthetic disaster. We made the pancakes too thin, did not cook them long enough, and tried too much flipping.


We were, however, quite buoyed by the taste. It was delicious. It reminded me quite a bit of my travels in Japan. So we analysed the steps we did and came up with a second attempt.

First we heated the pans up for a while before adding in any batter.


We threw on some oil and spread the batter for a thicker pancake. It was almost 2 mm thick on the pan.


A this point of time, you need to let it cook for almost 2 minutes. Just sit back and relax in the mean time. After this, add on the Lettuce.


Throw on some bean sprouts.


We added mushrooms just for taste. They were not part of the recipe I had in Japan, however the fun part of this dish is that you can add almost anything to it. Feel free to experiment. 


Layer on the meat.


We threw in some of the sauce onto the fillings and let it soak through them whilst the pancake was cooking.


Now, traditionally this pancake would have been flipped over onto the other one. These were acrobatics that got us into trouble with the first attempt, so we went with the mundane approach. Put pancake number 2 on pancake number 1.  Now take your spatula and compress them down. You want to concentrate all those flavours in as thin a pancake as possible.


Once this was done, it was far easier to flip them from one pan to the other.


Keep cooking and compressing for a while. You want both sides to get this nice rich brown colour.


On the side, put some oil on a pan to fry your egg. Just break the egg over the pan, and break open the yolk with your spatula.


Now plate up. Get your noodles on a plate. Layer your pancake over and above that. Place your egg over your pancake. Get some cheese slices and put them on top of all this, smother on the sauce, and sprinkle some crushed Nori (sea weed) as a garnish.


Ok, so maybe we did not get the clean edges and the absolutely picture perfect okonomiyaki. However I think it was more because we were too hungry to spend time making it camera friendly. It smells and tastes absolutely delicious.
To celebrate, we decided to open up a bottle of Shochu that I got from Japan.


A fantastic meal, fantastic time, fantastic atmosphere. They say the fun of cooking is to see the smiles of the people you serve the food too. There is even more fun in cooking with a group of friends, experimenting with your food, attempting something outrageous, and laughing through the whole thing.
Here's to many more cook-offs and fun times.

Related Posts Plugin for WordPress, Blogger...